- Community home
- Community
- Archive
- M9 Camera - Tweaks
- Mark Topic as New
- Mark Topic as Read
- Float this Topic for Current User
- Bookmark
- Subscribe
- Mute
- Printer Friendly Page
Ask
Reply
Solution
M9 Camera - Tweaks
- Mark as New
- Bookmark
- Subscribe
- Mute
- Permalink
- Report Inappropriate Content
13-11-2015 04:57 PM
M9 Camera Tweaks
If you own the HTC One M9, you will have had some issues with the Camera especially in low light conditions.
I have tweaked some of the settings in my M9's camera which seem to have helped a lot.
I hope you find them helpful too.
Open the Camera and Tap on the 3 dots to expand the Camera Quick Settings. (As shown below)
Tap on “Auto-ISO” and change it to “ISO-200”.
This is a Maximum ISO setting, so you will get an incremental range from ISO-100 through to ISO-200. The reason I chose this setting was to give the best picture quality without introducing “noise” from the camera selecting too high an ISO range.
Back in the days of 35mm film cameras, the most popular film bought was ISO-100/200. It makes sense to select the best all round “day time” setting for your point and shoot experience.
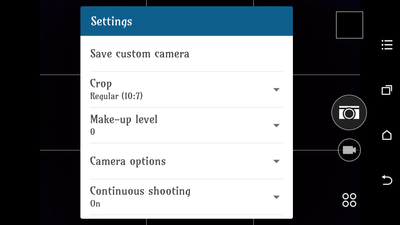
The M9 doesn't do a great job with colour Saturation, thankfully HTC have given us and easy way to fix this within the Cameras Settings.
Open the Camera
Tap on the Cog icon
Scroll down the menu and select “Camera Options”
Scroll down again and select “Image Adjustments”
Move the Saturation Slider to 0.5 or +1 it depends how saturated (colourful) you like your pictures.
You can also adjust the “Sharpness” if you want a crispier image.
I like crispy colourful images so these are my settings.
If you want the “Wedding” style photos you can turn up the saturation a bit more and lower the sharpness to -0.5/-1.
Crop Factor plays an important part in how a mobile phone camera handles an image and how quickly it can process the information for best quality.
We need to choose to optimum output size for our images.
You would think that the Phone screen size would be the best size to shoot a photograph… You would be wrong!
The best size to take a picture is one that closest resembles the sensor ratio.
In the M9 this is a ratio of 10:7.
This is the manufacturers optimum specification for both quality and speed of processing.
Open the Camera
Tap on the Cog icon
Scroll down the menu and select “Crop”
Choose “10:7”
The camera will atomatically adjust the resolution to match the crop factor.
The last thing to do is save your “Custom Camera” into the Camera selection Menu along with Panorama, Bokeh, Selfie and Auto etc…
Open the Camera
Tap on the Cog icon
Select the option “Save Custom Camera”
Press either Yes to save the custom Camera or No to save Another custom camera.
You can choose a Name to call your camera for quick selection later.
As you can see I have called my Camera “Saturation”
This still wont help you much in very low light conditions but you do have the "Raw" Camera and full manual mode to help in those conditions.
Let me know in the comments below if any of you would like help with Raw or manual mode?
Hope you found this helpful?
TSD.
- Labels:
-
Guide


